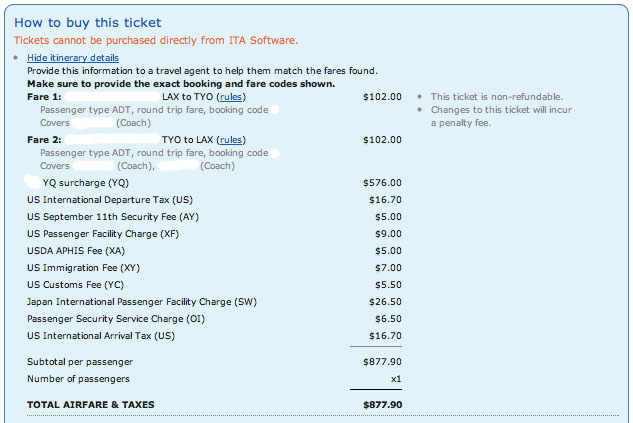
I showed you earlier today how to find and book a 3X. Here is an example of what to look for when you are testing a 3X. First, a screenshot of the candidate fare from Los Angeles to Tokyo:
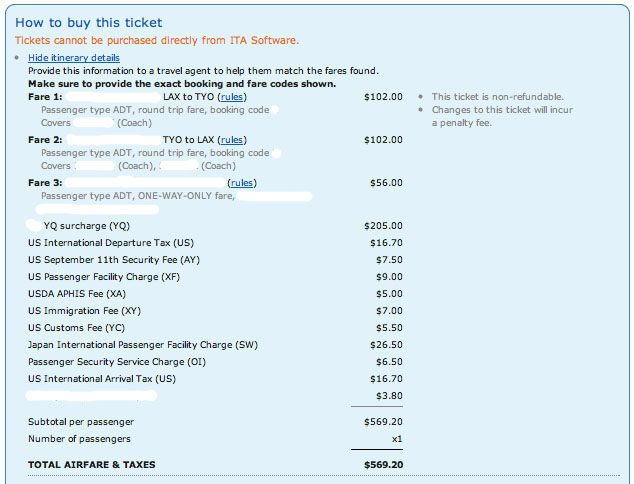
As you can see, there is a very hefty fuel surcharge (YQ) of $576. Over 65% of this fare is fuel surcharges! Now let’s take a look at what happens when I apply a 3X as part of a multi-city itinerary:
The new fare is only $569.20 all-in. Note that the 3X added on $56 in base fare and another few bucks worth of taxes. But it left the base fare intact and reduced the YQ all the way to $205. I’ve just saved hundreds of dollars, getting an effective 35% discount.
Notice that I’ve erased just about every distinguishing part of those fare constructions. I didn’t give you the 3X cities or even the fare basis codes and airline of the original candidate fare. This is about as much information as I’m willing to provide. The dump exists, and that’s all I’ll tell you. Please don’t harass me for more details about it because that’s something you need to learn to do on your own.
I’ll leave you with a note of caution against sharing similar information with other people. There is a PDF circulating of a recent PowerPoint presentation someone gave on fuel dumping. I got my hands on a copy, and it references an even better dump than this one. The author seemed to be boasting and tried to be clever, erasing the airline’s name and the cities of the 3X. But he left the airline’s logo. Not the most useful piece of information if you aren’t familiar with all the obscure airlines based in developing countries, but after 15 minutes of work with Google Images cross-referenced against data from OpenFlights, I had the answer. That’s why I covered up everything in my example above. You never know what shred of a clue will lead people to the answer.


