Brad told me a while ago that I should continue my series on how to use ITA, focusing on how to combine different pieces of advanced routing language when using ITA’s Matrix search engine. ITA is one of the most powerful ways to search for flights, with rules that will allow you to specify individual flights, carriers, alliances, and just about anything else you can think of. It’s great when you want to construct a complicated itinerary or look for mileage runs.
The problem for some is that even if you understand the advanced routing language, it isn’t always obvious how to combine it into more complicated instructions. Use English as an analogy. Just because you’ve memorized the dictionary doesn’t mean you understand the syntax of constructing a sentence. The software can’t make sense of your request without the proper syntax.
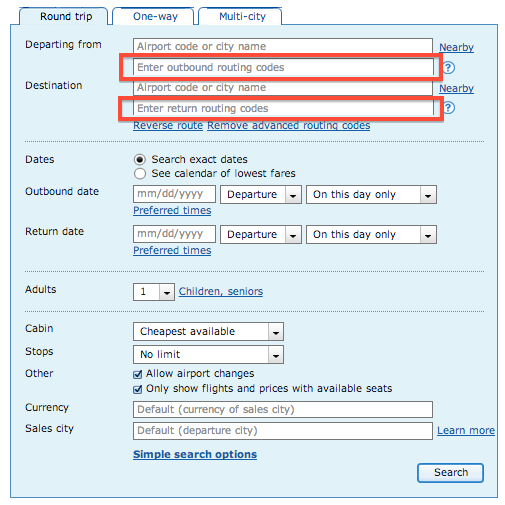
When I read questions online (usually posted on Flyertalk), they tend to fall into three categories, so this post will have three corresponding sections. Before continuing, make sure you have some basic familiarity with ITA from reading my previous posts:
How do I specify carriers and connecting airports?
Answering the first question isn’t hard, but implementation requires practice. You can specify carriers, connecting airports, or both. Think of it as defining the progression of events. You don’t have to specify every event, but the ones you do specify will happen in the order you request. Outside those specifications, ITA will fill in the blanks with more flexibility. Obviously if you have a connection specified without choosing a carrier to get you there, ITA will need to pick at least one.
UA
… Just one segment on United Airlines
SFO
… Just one connection in San Francisco
UA SFO
… One segment on United, followed by a connection in San Francisco
UA SFO UA
… One segment on United, a connection in San Francisco, and another segment on United
SFO UA
… One connection in San Francisco, and then a flight on United
You can specify more than one carrier or more than one airport by separating them with commas. A comma means “OR.” Keep in mind this only applies to the event occurring at that point in the itinerary and not to later flights or connections.
UA,AS SFO UA,AA JFK UA
The example above requires a segment on United or Alaska to get to San Francisco, then a segment on United or American to get to New York’s JFK, followed by one more segment on United only.
You can allow for more than one segment using the “+” symbol. I often tack this on to the beginning or end of an itinerary when I am more concerned above how to specify the long segments over water but not about how to get to and from my gateway airports.
UA+ IAD,EWR LH FRA
This example requires any number of United segments to get me to either Washington-Dulles or Newark. If I were starting in Seattle, that means I could fly nonstop or make a connection somewhere like Denver, which might be cheaper. I then requested a single Lufthansa flight to get to Frankfurt. After that, I left it open ended. I may not be at my final destination yet, but I also haven’t told ITA about any preferences, so it can fill in the blanks with any carriers and any connections it considers necessary.
It’s worth remembering that the carrier codes only apply to the flight number, or how the flight is marketed. If you want the flight to be operated by a specific carrier, use the “O:” command. For example, “UA+ IAD,EWR O:LH FRA” will force the overwater segment to be on a Lufthansa-operated flight. I almost never bother to include this feature and just check manually for codeshares, which have an asterisk next to them in the search results.
How do I specify alliances?
Let’s move on to alliances. If you specify the alliance, then that is ALL you can do. ITA doesn’t like anything else cluttering the command line. To specify the alliance you enter one of the following:
/alliance star-alliance
/alliance oneworld
/alliance skyteam
However, I often find that the “/alliance” command is overused. It’s good for broad searches, things like looking for a mileage run or if you just know that you prefer to credit your miles to a certain program. But once you start to narrow your options, it becomes unnecessarily restrictive.
What if you have the chance to save $400 on a complicated itinerary by including a short hour-long segment on Alaska instead of United at the end of an international itinerary? That option will never appear if you use the “/alliance star-alliance“ command, but it is probably worth considering as a way to save lots of money and give up just a few miles.
After beginning your broad search just to get a sense of what’s out there, switch to specifying connecting airports instead. A good knowledge of your alliance’s major hubs will be sufficient. Someone who specifies connections in SFO, EWR, and FRA is almost certainly going to be traveling on Star Alliance. Choosing SLC, ATL, and CDG is going to put you on Sky Team.
Specifying an alliance can still be better than specifying a single carrier. That individual carrier may include flights operated by other carriers, but they will all be codeshares. Just recently I was helping a reader who couldn’t replicate a cheap flight he and found on Google Flights, which was odd because Google also owns ITA. It turns out he was getting more expensive options when a KLM flight was listed as a Delta codeshare. When the same flights were marketed by the operating carriers (rather than all by Delta or all by KLM) the price became cheaper.
How do I specify the booking class?
There is only one other command that involves a forward slash, and fortunately you can use it with other commands. This command will specify one or more booking classes if you are looking for something like a W-fare to use a United systemwide upgrade.
/f bc=w
Deciphering this code, “/f” means we are looking for a specific fare and “bc=” is the booking class we want. You can look for more than one booking class at a time by separating them with a vertical bar (it’s on the same key as the backslash).
/f bc=w|bc=v|bc=f
Although you can specify the fare class at the same time as you make other requests, you need to include this command at the very end. See this example:
UA SFO UA+ /f bc=w
The example requires one United segment to San Francisco, followed by one or more United segments to complete the itinerary. All of the segments must be booked into the W booking class, which is eligible for a United systemwide upgrade on international itineraries.
In practice, it makes sense to include multiple fare classes. Perhaps W is full on one segment, and like with the alliance commands, you’re overlooking a potential compromise if it is all you request. But typing all the fare classes is tedious. What I do instead is I only request the W booking class, but I also uncheck the box next to “Only show flights and prices with available seats.” This way, it will quote me a fare assuming W is available on every segment. Then, I run the search again with the box checked. If the cheapest fare is still available, success! If not, then I try to figure out which one is causing problems.
Conclusion
Learning to use advanced routing language requires a tricky balance between weeding out all the bad options and leaving just enough to permit cost-saving compromises. At the same time, you can’t make things too open-ended or else the advanced routing language hasn’t saved you much at all. Remember, ITA only has 60 seconds to find your perfect itinerary before it times out. When you tell it you don’t want flights on a specific airline, you’re helping it help you by giving it one less thing to worry about.
If I’ve left something out, made a mistake, or haven’t answered your question, please let me know. ITA is a tricky beast. I’ve seen even a few experts learn a thing or two, so the only way to improve is through questions and good practice.

