TSA’s PreCheck service is great. In fact, I’m even willing to call it a “service” because it’s the one thing the TSA has actually gotten right as far as airport security is concerned. TSA officials claim that they want to make PreCheck the future for most passengers — not just elite passengers — and I sincerely hope that’s the case.
In the meantime, I am increasingly frustrated by its implementation at my home airport in Seattle. It was moved a few months back to a new location that is equally inconvenient from just about every gate and a longer walk from the transit link to downtown.
I now have to walk halfway down the airport, go through security, and then walk halfway back to reach my gate. It’s still worthwhile if I get the triple beep that says I’m cleared to use PreCheck, but if I don’t then the extra walking and waiting usually adds 10 minutes without much improvement in my security experience.
I want to know if I’m going to get approved for PreCheck before I walk out of my way to stand in that line.
Fortunately, that information is stored in your boarding pass barcode. It does not appear to be a random decision made at the time the boarding pass is scanned. If you can read that information, you should be able to find a common feature that identifies a PreCheck-approved boarding pass vs. a non-approved pass. (HT to Colpuck for being the first to share this as far as I know.)
I use an iPhone app called Qrafter (free download available from the iTunes App Store). This app was designed to scan QR codes, which advertisers often use to direct you to a web address. However, there are many forms of barcodes.
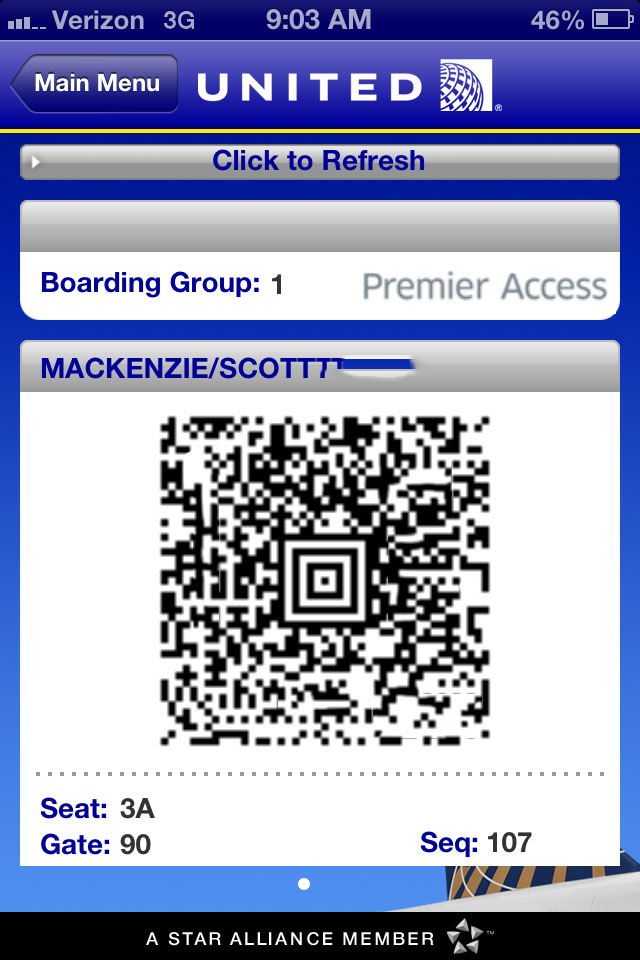
The barcode on your printed boarding pass is a standard 1D barcode since variations only occur in one dimension: the thickness of the bars. These won’t work with Qrafter. Mobile boarding passes come in a 2D form with changes along both the axes. QR codes have three squares in the corners to orient the scanner. Mobile boarding passes use a similar version called an Aztec code that uses a single square in the middle.

Determine Your PreCheck Status in Advance!
Here’s how I check my clearance to use the PreCheck lane before even showing up at the airport. (My example uses an iPhone.)
- Access your mobile boarding pass on your iPhone.
- Take screenshot by pressing the home button (at the bottom) and the power button (at the top) simultaneously. It helps if you press the one first and hold while you press the other button.
- Open Qrafter and tell it to scan a picture from your photo library. Be sure to select the option to move and scale since if the Aztec code is at the bottom it will get cut off.
- Access the screenshot and orient the scanner to center on the Aztec code.
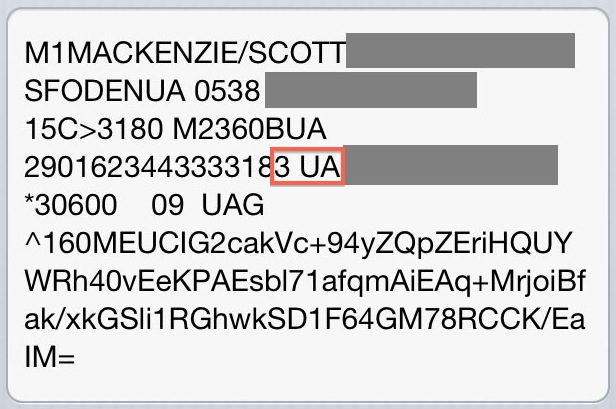
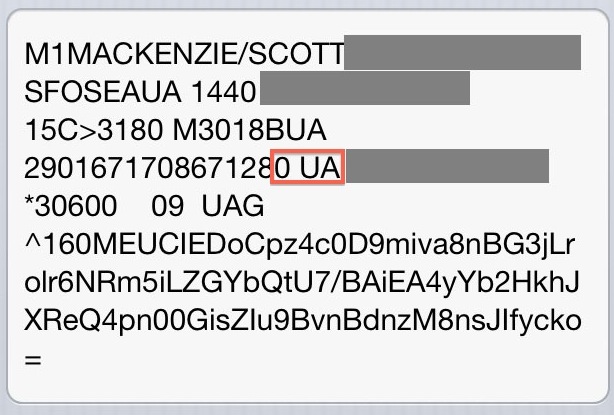
- You’ll get a text output with lots of information, including your name, destination, confirmation number, and frequent flyer number. I’ve blurred some parts of the photos in this example to protect myself. 😉
- Look for a portion of the code, about four lines down in this example, right before the airline code (“UA” = United Airlines). There is a string of numbers that ends with either “2901….0 UA” or “2901…3 UA”
- If you get “0 UA” then you are not cleared for PreCheck. If you get “3 UA” then you ARE cleared for PreCheck.
Of course, TSA might be looking for something else, but I’ve had pretty good success using this method to predict whether I’ll get one beep or three. Remember, “3 UA” means 3 beeps and clear for PreCheck!


How to Improve your PreCheck Odds
Many people can get into PreCheck through an invitation from their airline loyalty program. That’s how Megan and I started (and she’s only Premier Gold with United). However, it doesn’t work that well as I explained in my introduction. At about a 50% success rate, it just created a lot of false hope.
But most people can go a step further and get a real trusted traveler ID that bumps your odds to almost perfect. The most obvious method is to get Global Entry, which costs $100 and may be reimbursed by your airline (United does this for Premier Platinum and Premier 1K members) or your credit card issuer (American Express does this for personal and business Platinum Card holders).
Less common are the NEXUS and SENTRI programs, intended for border crossings with Canada and Mexico, respectively. These two programs cost only $50, and you’ll still get a trusted traveler ID that can also be used for PreCheck.
Now I know I argued in the past with some who claimed you could use Global Entry kiosks with just a NEXUS card. I didn’t dispute that, only that I thought their use was still limited to kiosks at borders with Canada or Mexico. It just didn’t make sense that they’d give you all the same benefits as Global Entry for half the price, and the language online was a bit vague.
So I chatted up the friendly Customs and Border Patrol officer during my interview, and she confirmed this was true! She agreed it was silly but explained one catch: You can’t get NEXUS at just any CBP office; only those along the U.S.-Canada border (like in Seattle) are eligible. So you’ll need to come up here to get the sale price! Or, try for SENTRI if you live along the southern border with Mexico. In fact, NEXUS and SENTRI can potentially offer more benefits than Global Entry alone if you expect to do any land border crossings.
Once you have a trusted traveler ID, make sure it’s in your passenger profile when you book your ticket. When using the invitation-only process tied to an airline loyalty program, I was obviously out of luck if I booked with another airline besides United. But now I can use my number with any domestic airline. Finally, it’s also important to make sure your name on the reservation matches the one on your ID card, which means watching for things like middle initials.
If you don’t want to get a trusted traveler ID and want to rely on the free participation through your airline’s loyalty program, here are links to some of the major airlines’ information pages:
…And How to Game the System
I’ll end with a “trick” to at least expedite your security nightmare even if you don’t get to opt-out of the full body scan.
If you go through the PreCheck lane and get the dreaded single-beep, you will be shunted off to the normal security process, but you will also find yourself at the front of the line. Before PreCheck was moved at SeaTac, it actually ran parallel with the premium security line.
On occasions where there might be 20 people in the premium line, I knew I was PreCheck eligible, so I’d go in that line which had only one or two. Yes, my odds were only 50% in those days without Global Entry. But when I didn’t clear, I was not only at the front of the line but at the front of the premium line, too!
Airport personnel do check if you have a membership card or a first class boarding pass to enter the premium security lane. They do not check if you have Global Entry to enter the PreCheck lane, so anyone can go in knowing they will fail but still move to the front of the screening process.
I consider it dishonest to flash a grocery or other unrelated loyalty card and try to pass it off as though you’re a top-tier elite with access to the premium security lane. However, since no one is actually checking if you are eligible to use the PreCheck lane, this other approach seems somewhat permissible. I’ll leave you to make up your own mind, but I think it’s easier (and more reliable) to just pay $50-100 for a trusted traveler ID of your own.
